Angular JS Project Setup and Hello World Application
To do Angular JS Project Setup and develop Hello World application, you will need to install Node.js and “npm” first on your machine. The following are the necessary steps that you need to do in order to get started with Angular.
1. Install Node.js and npm
- Download the Windows installer from Node.js web site
- Run the installer and follow the prompts and complete the installation steps.
- Restart your PC. That’s it !
Note: The Node Package Manager (npm) is installed as part of Node.js. So you no need to install them separately.
Next you can check whether Node and npm is installed. You can run following commands to check whether Node and npm is installed.
E:\Sneppets\Angular_workspace>node -v
v8.9.3

E:\Sneppets\Angular_workspace>npm -v
5.5.1
You can also test whether node.js runs or not. To do that let’s create and “hello.js” file under “hello” world with the following text content in it
console.log("Node is installed and working!");
Now, run the following command to confirm that it’s working!
E:\Sneppets\Angular_workspace\hello>node hello.js
Node is installed and working!
2. Install TypeScript
Once you are done installing Node.js, next step is to install TypeScript. Note, that TypeScript is not must, but probably it’s better to use with Angular, because it’s great, generally used by everyone and it makes working with Angular easier.
To install TypeScript, run the following npm command
npm install -g typescript
3. Install Google Chrome Browser
It is recommended to use Google Chrome Web Browser to develop Angular applications and use Chrome developer toolkit for your development purpose.
4. Install Angular CLI
Angular CLI is an utility provided by Angular framework which allows users to create and manage projects from command line. Project related tasks like creating projects, adding new controllers etc., can be automated using Angular CLI.
This utility can be installed using the following npm command
npm install –g @angular/cli
Once Angular CLI is installed, then you will be able to run Angular apps from command line using ng command like below.
C:\>ng --version

    _                      _                 ____ _     ___
   / \   _ __   __ _ _   _| | __ _ _ __     / ___| |   |_ _|
  / ? \ | '_ \ / _` | | | | |/ _` | '__|   | |   | |    | |
 / ___ \| | | | (_| | |_| | | (_| | |      | |___| |___ | |
/_/   \_\_| |_|\__, |\__,_|_|\__,_|_|       \____|_____|___|
               |___/

Angular CLI: 1.7.4
Node: 8.9.3
OS: win32 ia32
Angular:
...
Congratulations!! Your Angular Project Setup is Ready.
Angular Hello World Application
Now let’s try to create example project using Angular CLI using ng command. Open up new command prompt and run the following command to create new project from scratch.
ng new angular-hello-world
The above command will run for a while and it will install npm dependencies. Once it is done you would see the following success message
“Project ‘angular-hello-world‘ successfully created”
The “angular-hello-world” directory should look like the following
/angular-hello-world

├── e2e/ // end to end tests
├── node_modules/ // installed dependencies
├── src/ // application source
├── .angular-cli.json // angular-cli configuration file
├── karma.conf.js // unit test configuration
├── package.json // npm configuration
├── protractor.conf.js // e2e test configuration
├── README.md // an useful README
└── tslint.json // linter config file
Check “src” folder above, that is where we have to write our custom application code. This folder looks like the following
|-- app/
| |-- app.component.css
| |-- app.component.html
| |-- app.component.spec.ts
| |-- app.component.ts
| `-- app.module.ts
|-- assets/
|-- environments/
| |-- environment.prod.ts
| `-- environment.ts
|-- favicon.ico
|-- index.html
|-- main.ts
|-- polyfills.ts
|-- styles.css
|-- test.ts
`-- tsconfig.json
Open “index.html”. You should be seeing the following code
<!doctype html>
<html lang="en">
<head>
  <meta charset="utf-8">
  <title>Angular Hello World</title>
  <base href="/">

  <meta name="viewport" content="width=device-width, initial-scale=1">
  <link rel="icon" type="image/x-icon" href="favicon.ico">
</head>
<body>
  <!-- app-root tag is where our application will be rendered
	   * app-root is a component that is defined by our Angular Application-->
  <app-root>Please wait...</app-root>
</body>
</html>
The “app-root” tag is where our application will be rendered. The text “Please wait…” is a placeholder which will be displayed before our angular app loads. And “app-root” is a component that is defined by our Angular application and this where this “app-root” tag comes from.
Running the application
Angular CLI has built in HTTP server and you can use that to run your application. To run your app, go to the project root directory in the command prompt and run the following command.
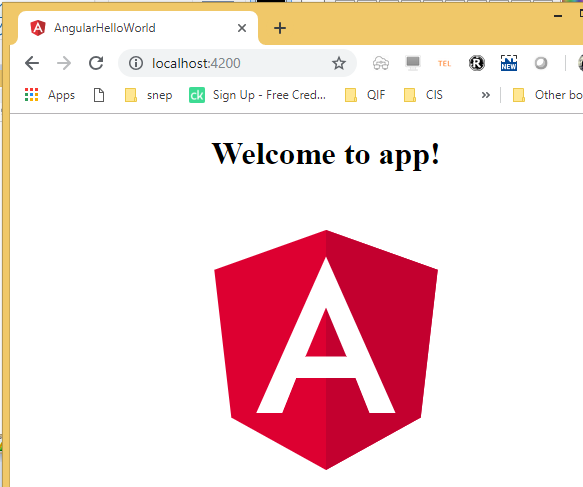
E:\Sneppets\Angular_workspace\angular-hello-world> ng serve
** NG Live Development Server is running on http://localhost:4200. **
// ...
//messages
// ...
webpack: Compiled successfully.
That’s it now our application will be running on localhost port 4200. Open Google Chrome browser and visit the following URL
http://localhost:4200/
Further Learning