ngOnDestroy Example Angular
This tutorial guides you on what is ngOnDestroy and why should we use ngOnDestroy lifecycle hook in Angular.
What is ngOnDestroy ?
ngOnDestroy() is a callback method which will be used to perform clean-up. This lifecycle hook will be invoked immediately before a directive or pipe or service instance is destroyed.
And ngOnDestroy() lifecycle hook will get called after the following lifecycle hooks get invoked.
- ngOnChanges() – Invoked after a bound input property changes.
- ngOnInit – Invoked once the component is initialized.
- ngDoCheck – Invoked after every change detection run
- ngAfterContentInit – Invoked after content (ng-content) has been projected into view.
- ngAfterContentChecked – Invoked every time after the projected content has been checked.
- ngAfterViewInit() – Invoked after component’s view has been initialized.
- ngAfterViewChecked() – Invoked every time the component’s view have been checked.
- ngOnDestroy() – Invoked when the component is about to be destroyed.
Therefore, we can say this lifecycle hook will get invoked everytime the projected content (ng-content) has been checked.
ngOnDestroy(): void

Parameters
There are no parameters.

Returns
void
Why should we use ngOnDestroy in Angular ?
OnDestroy is a lifecycle hook that will be called whenever a directive or pipe or service instance is destroyed. You can define your own custom clean-up functionality to perform clean-up that needs to happen whenever the instance is destroyed.
interface OnDestroy{

  ngOnDestroy(): void

}
The following code sneppets shows how to implement the above interface in your component to define your own custom clean-up functionality.
import {
  AfterViewChecked,
  AfterViewInit,
  AfterContentChecked,
  AfterContentInit,
  Component,
  DoCheck,
  Input,
  OnChanges,
  OnInit,
  SimpleChanges,
  OnDestroy
} from '@angular/core';

@Component({
  selector: 'app-item-element',
  templateUrl: './item-element.component.html',
  styleUrls: ['./item-element.component.css'],

})

export class ItemElementComponent implements OnInit, OnChanges, DoCheck, AfterContentInit, AfterContentChecked, AfterViewInit, AfterViewChecked, OnDestroy{

  @Input() itemElem : {type: string, title: string, desc: string, spec: string};
  @Input() title : string;

  constructor() {
    console.log("constructor called.....");
  }

  ngOnChanges(changes: SimpleChanges) {
    console.log("ngOnChanges called.....");
    console.log(changes);
  }

  ngOnInit(): void {
    console.log("ngOnInit called.....");
  }

  ngDoCheck(){
    console.log("ngDoCheck called.....");
  }

  ngAfterContentInit(){
    console.log("ngAfterContentInit called.....");
  }

  ngAfterContentChecked(){
    console.log("ngAfterContentChecked called.....");
  }

  ngAfterViewInit(){
    console.log("ngAfterViewInit called.....");
  }

  ngAfterViewChecked(){
    console.log("ngAfterViewChecked called.....");
  }

  ngOnDestroy(){
    console.log("ngOnDestroy called.....");
  }

}
For example, “Destroy Component” button is added in the following code to demonstrate ngOnDestroy functionality.
<div class="container">
  <app-create-item (itemAdded)="onItemAdded($event)"
                   (itemSpecAdded)="onItemSpecAdded($event)"></app-create-item>
  <hr>
  <div class="row">
    <div class="col-xs-12">
      <button class="btn btn-primary" (click)="onChangeComponentElement()">Change item element</button>
      <!-- ngOnDestroy() demo -->
      <button class="btn btn-danger" (click)="onDestroyComponentElement()"> Destroy component</button>
      <app-item-element *ngFor="let elem of itemElems"
                        [itemElem] = "elem"
                        [title] = "elem.title">
                        <!-- Projecting content into component with ng-content -->
                        <p>
                          <strong *ngIf="elem.type === 'item'" style="color: orange">{{ elem.desc }}</strong>
                          <em *ngIf="elem.type === 'spec'">{{ elem.spec }}</em>
                        </p>
      </app-item-element>
    </div>
  </div>
</div>
The component’s class file will have the following code to remove the elements. Whenever onDestroyComponentElement() is called, it will invoke ngOnDestroy() lifecycle hook.
import { Component } from '@angular/core';

@Component({
  selector: 'app-root',
  templateUrl: './app.component.html',
  styleUrls: ['./app.component.css']
})
export class AppComponent {
  itemElems = [{type: 'item', title:'Google Pixel', desc:'Android phone by Google', spec:''},
  {type: 'spec', title:'Specifications', desc:'', spec:"Specifications of Google Pixel"}];

  onItemAdded(itemData:{itemTitle: string, itemDesc: string}) {
    this.itemElems.push({
      type: 'item',
      title: itemData.itemTitle,
      desc: itemData.itemDesc,
      spec:''
    });
  }

  onItemSpecAdded(itemSpecData:{itemTitle: string, itemSpec: string}) {
    this.itemElems.push({
      type: 'spec',
      title: 'Specifications',
      desc:'',
      spec: 'Specifications of '+ itemSpecData.itemTitle
    });
  }

  onChangeComponentElement() {
    this.itemElems[0].title = 'Changed 1st title!!';
    this.itemElems[1].title = 'Changed 2nd title!!';
  }

  onDestroyComponentElement() {
    this.itemElems.splice(0,1);
  }

}
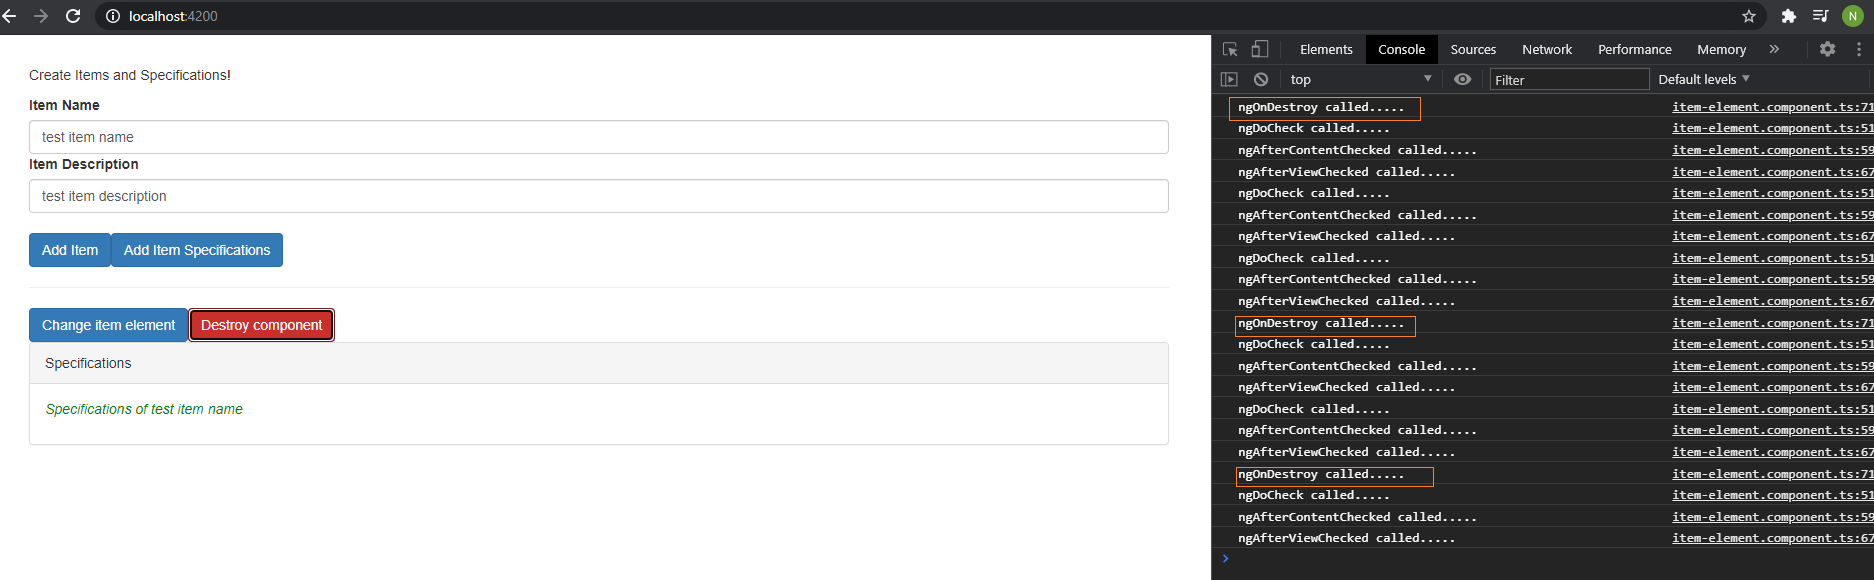
Finally, when you run the above code, you can see ngOnDestroy lifecycle hooks getting called in following logs from chrome developer tools console. I had created four item elements and tried to destroy three item component elements as shown below.
That’s it. You had learnt what is ngOnDestroy lifecycle hook and when we should use ngOnDestroy in Angular.
Hope it helped :-).
Also See:
- Call ngOnInit() again from another function – Angular 9 ?
- ngOnChanges get new value and previous value – Angular
- Why do we need ngDoCheck lifecycle hook – Angular ?
- Global Angular CLI version is greater than your local version
- Upgrade Angular CLI to the latest version Angular 9 or 10 ?
- ViewEncapsulation modes and differences
- How to use new static option in ViewChild Angular 9 ?
- Project contents into angular components using ng-content
- Call ngOnInit() again from another function – Angular 9 ?
- ngAfterContentInit with Example – Angular
- How Angular Encapsulates Styles using ViewEncapsulation ?
- ngAfterViewInit with Example – Angular
- ngAfterContentChecked with Example