ngOnChanges get new value and previous value – Angular
This tutorial guides you on how to use ngOnChanges in Angular application and how to get new value and previous value.
ngOnChanges get new value and previous value – Angular
To learn how to use ngOnChanges in your angular application, you will have to import OnInit and OnChanges as shown below.
import {
  Component,
  Input,
  OnChanges,
  OnInit,
  SimpleChanges
} from '@angular/core';
ngOnChanges runs first i.e., it runs before ngOnInit() life cycle hook. The ngOnChanges() hook is the only lifecycle hook that receives argument. It receives argument “changes” and it is of type “SimpleChanges” which also need to be imported from ‘@angular/core’. Let’s simply log “changes” and see how to check or get new value (current value) and previous value.
ngOnChanges(changes: SimpleChanges) {
   console.log("ngOnChanges called.....");
   console.log(changes);
}
To see when ngOnChanges() getting fired, I have made some changes in the following example code.
ItemElementComponent class
Implemented the method ngOnChanges with argument “changes” to demonstrate current value and previous value.
export class ItemElementComponent implements OnInit, OnChanges{

    @Input() title : string;

    ngOnChanges(changes: SimpleChanges) {
      console.log("ngOnChanges called.....");
      console.log(changes);
    }

    ngOnInit(): void {
      console.log("ngOnInit called.....");
    }

    ----

}
ItemElementComponent template file
<div class="panel-heading">{{ title }}</div>
AppComponent template file
Added the following expression in app-item-element tag [title] = “elem.title”
<div class="container">
  -----
  ------
    <div class="col-xs-12">
      <button class="btn btn-primary" (click)="onChangeFirst()">Change item element</button>
      <app-item-element *ngFor="let elem of itemElems"
                        [itemElem] = "elem"
                        [title] = "elem.title">
                        -----
                        ----
      </app-item-element>
    </div>
  ---
</div>
AppComponent class
Added the onChangeFirst() method to demonstrate ngOnChanges() lifecycle hook.
export class AppComponent {
  itemElems = [{type: 'item', title:'Google Pixel', desc:'Android phone by Google', spec:''},
  {type: 'spec', title:'Specifications', desc:'', spec:"Specifications of Google Pixel"}];

  -----
  -----
  onChangeFirst() {
    this.itemElems[0].title = 'Changed 1st title!!';
    this.itemElems[1].title = 'Changed 2nd title!!';
  }

}
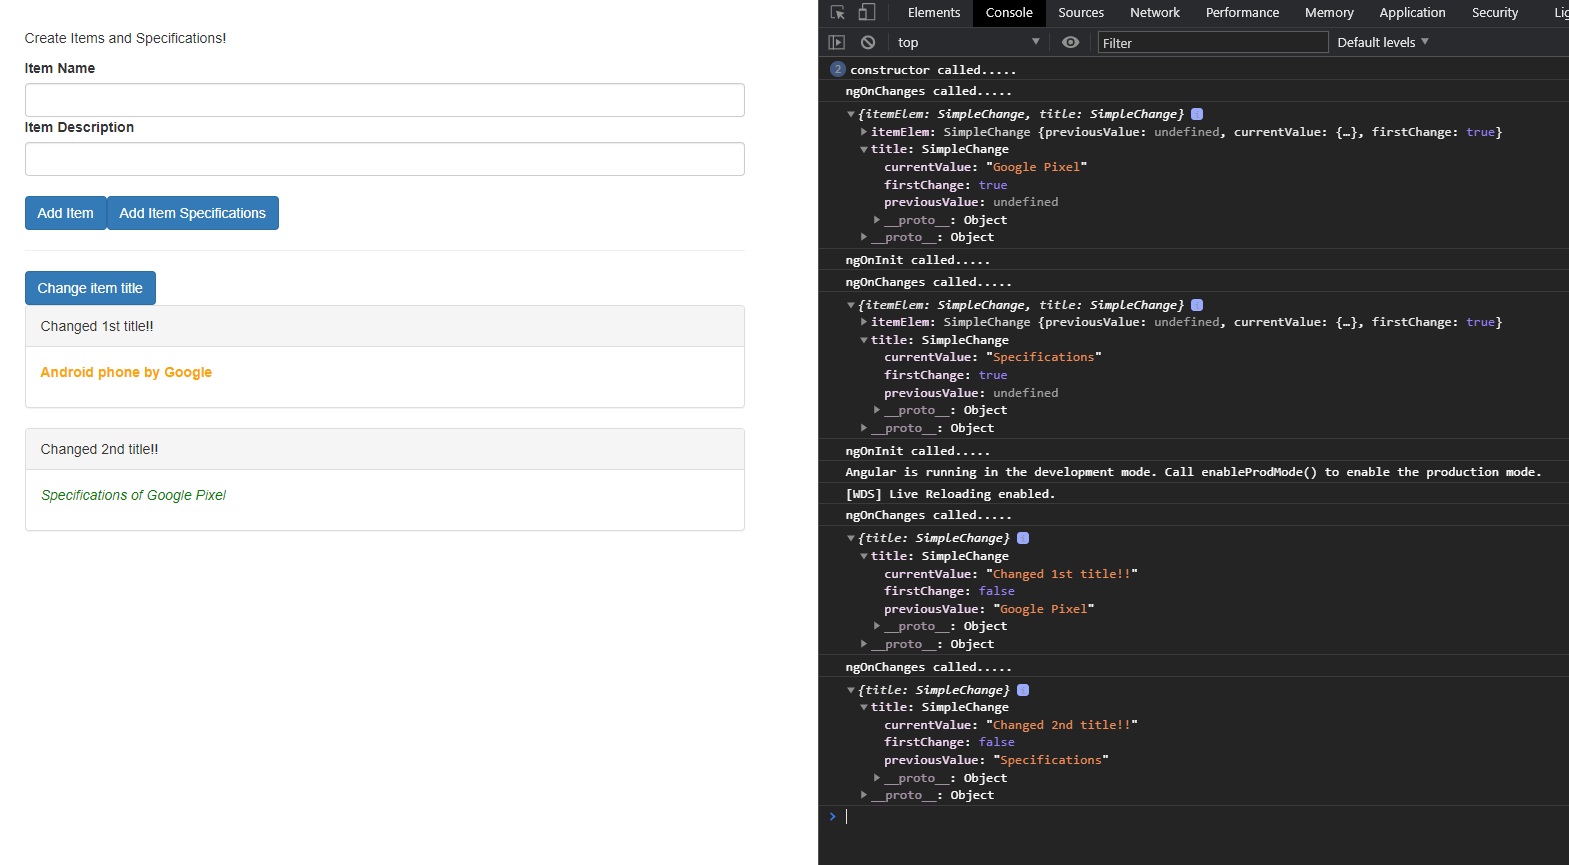
The following is the complete example code to demonstrate ngOnChanges get new value and previous value in angular. And by using Chrome DevTools console you will come to know when ngOnChanges() getting fired and how to get new value (current value) and previous value as shown in the screenshot below.
app.component.html
<div class="container">
  <app-create-item (itemAdded)="onItemAdded($event)"
                   (itemSpecAdded)="onItemSpecAdded($event)"></app-create-item
  <hr>
  <div class="row">
    <div class="col-xs-12">
      <button class="btn btn-primary" (click)="onChangeFirst()">Change item element</button>
      <app-item-element *ngFor="let elem of itemElems"
                        [itemElem] = "elem"
                        [title] = "elem.title">
                        <!-- projecting content into component with ng-content -->
                        <p>
                          <strong *ngIf="elem.type === 'item'" style="color: orange">{{ elem.desc }}</strong>
                          <em *ngIf="elem.type === 'spec'">{{ elem.spec }}</em>
                        </p>
      </app-item-element>

    </div>
  </div>
</div>
app.component.ts
import { Component } from '@angular/core';

@Component({
  selector: 'app-root',
  templateUrl: './app.component.html',
  styleUrls: ['./app.component.css']
})
export class AppComponent {
  itemElems = [{type: 'item', title:'Google Pixel', desc:'Android phone by Google', spec:''},
  {type: 'spec', title:'Specifications', desc:'', spec:"Specifications of Google Pixel"}];

  onItemAdded(itemData:{itemTitle: string, itemDesc: string}) {
    this.itemElems.push({
      type: 'item',
      title: itemData.itemTitle,
      desc: itemData.itemDesc,
      spec:''
    });
  }

  onItemSpecAdded(itemSpecData:{itemTitle: string, itemSpec: string}) {
    this.itemElems.push({
      type: 'spec',
      title: 'Specifications',
      desc:'',
      spec: 'Specifications of '+ itemSpecData.itemTitle
    });
  }

  onChangeFirst() {
    this.itemElems[0].title = 'Changed 1st title!!';
    this.itemElems[1].title = 'Changed 2nd title!!';
  }

}
item-element.component.html
<div
class="panel panel-default">
<!-- <div class="panel-heading">{{ itemElem.title }}</div> -->
<div class="panel-heading">{{ title }}</div>
<div class="panel-body">
  <ng-content></ng-content>
</div>
</div>
item-element.component.ts
import {
  Component,
  Input,
  OnChanges,
  OnInit,
  SimpleChanges,
  ViewEncapsulation
} from '@angular/core';

@Component({
  selector: 'app-item-element',
  templateUrl: './item-element.component.html',
  styleUrls: ['./item-element.component.css'],
})

export class ItemElementComponent implements OnInit, OnChanges{

  @Input() itemElem : {type: string, title: string, desc: string, spec: string};
  @Input() title : string;

  constructor() {
    console.log("constructor called.....");
  }

  ngOnChanges(changes: SimpleChanges) {
    console.log("ngOnChanges called.....");
    console.log(changes);
  }

  ngOnInit(): void {
    console.log("ngOnInit called.....");
  }

}
That’s it. You had learnt how to use ngOnChanges and get new value and previous value.
Hope it helped 🙂
Also See:
- ViewChild in Angular 9 Example
- Can’t bind to ‘itemElem’ since it isn’t a known property of
- Best way to bundle an angular app for production deployment ?
- Type definition for properties and object literal
- Get index of ngFor element using index as value in attribute
- Global Angular CLI version is greater than your local version
- Upgrade Angular CLI to the latest version Angular 9 or 10 ?
- Configure XAMPP PHP to send mail from localhost ?
- ViewEncapsulation modes and differences
- How to use new static option in ViewChild Angular 9 ?
- Project contents into angular components using ng-content
- Call ngOnInit() again from another function – Angular 9 ?
Thank you. This suggestion helped.