How to Modularize Angular Application – Angular 9 ?
This tutorial guides you on how to modularize angular application by splitting angular app in to components. Let’s learn how to modularize angular application with an example.
Modularize Angular Application – Angular 9
If your Angular application is all running in one component, let’s say App Component. And if all the code is written in the app component, then it is recommended to split the logic and move to a different component. Note, it is not good to have all the logic in App Component alone.
Splitting up logic in to different component will also enable you to reuse the component in different places.
Let’s consider the following example, in which all the code is written in App Component.
app.component.html
<div class="container">
  <div class="row">
    <div class="col-xs-12">
      <p>Add Item Name and Description!</p>
      <label>Item Name</label>
      <input type="text" class="form-control" [(ngModel)]="newItemName">
      <label>Item Description</label>
      <input type="text" class="form-control" [(ngModel)]="newItemDesc">
      <br>
      <button
        class="btn btn-primary"
        (click)="onAddItem()">Add Item</button>
      <button
        class="btn btn-primary"
        (click)="onAddItemSpec()">Add Item Specifications</button>
    </div>
  </div>
  <hr>
  <div class="row">
    <div class="col-xs-12">
      <div
        class="panel panel-default"
        *ngFor="let elem of itemElems">
        <div class="panel-heading">{{ elem.title }}</div>
        <div class="panel-body">
          <p>
            <strong *ngIf="elem.type === 'item'" style="color: orange">{{ elem.desc }}</strong>
            <em *ngIf="elem.type === 'spec'">{{ elem.spec }}</em>
          </p>
        </div>
      </div>
    </div>
  </div>
</div>
app.component.ts
import { Component } from '@angular/core';

@Component({
  selector: 'app-root',
  templateUrl: './app.component.html',
  styleUrls: ['./app.component.css']
})
export class AppComponent {
  itemElems = [];
  newItemName = '';
  newItemDesc = '';
  newItemSpec = '';

  onAddItem() {
    this.itemElems.push({
      type: 'item',
      title: this.newItemName,
      desc: this.newItemDesc
    });
  }

  onAddItemSpec() {
    this.itemElems.push({
      type: 'spec',
      title: 'Specifications',
      spec: 'Specifications of ' + this.newItemName,
    });
  }
}
When you run the above angular code you would see the following output.
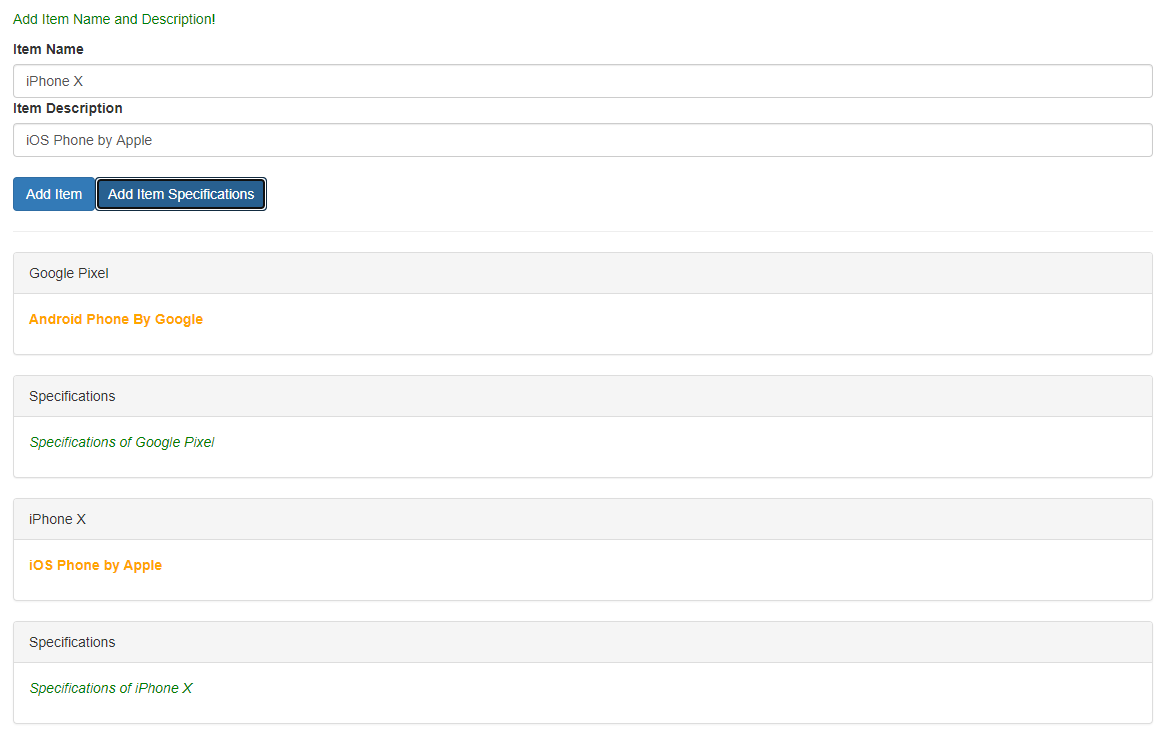
How to split app component to modularize our angular application?
We could create a separate component for section where we enter item name and item description with buttons. Let’s call it as “create-item” component.
And of course we can also create component for individual items that can be created. let’s call it as “item-element” component. With this modularization we will have much leaner app component HTML file. And we will be able modularize our business logic better so that reusability can be improved.
You can use angular CLI or do it manually to create individual components. Let’s create “create-item” component using ng command as shown below.
>ng g c create-item

CREATE src/app/create-item/create-item.component.html (26 bytes)
CREATE src/app/create-item/create-item.component.spec.ts (657 bytes)
CREATE src/app/create-item/create-item.component.ts (294 bytes)
CREATE src/app/create-item/create-item.component.css (0 bytes)
UPDATE src/app/app.module.ts (479 bytes)
Then let’s create “item-element” component as shown below.
>ng g c item-element

CREATE src/app/item-element/item-element.component.html (27 bytes)
CREATE src/app/item-element/item-element.component.spec.ts (664 bytes)
CREATE src/app/item-element/item-element.component.ts (298 bytes)
CREATE src/app/item-element/item-element.component.css (0 bytes)
UPDATE src/app/app.module.ts (583 bytes)
With this you will get two new folders under app component. Now let’ start modifying app component and move the logic to the new components that are created as shown below.
After modifications your App component should looks like below.
app.component.html
Now, we have much cleaner app component code as shown below. Basically, we have moved the template code related to iteam name, item description and buttons to create-item.component.html template and made necessary changes to bind custom events “itemAdded” and “itemSpecAdded” amd custom property “itemElement”.
<div class="container">
  <app-create-item (itemAdded)="onItemAdded($event)"
                   (itemSpecAdded)="onItemSpecAdded($event)"></app-create-item>
  <hr>
  <div class="row">
    <div class="col-xs-12">
      <app-item-element *ngFor="let elem of itemElems"
                        [itemElement] = "elem"></app-item-element>
    </div>
  </div>
</div>
app.component.ts
Here we hade moved the methods onAddItem() and onAddItemSpec() to “create-item.component.ts” typescript file and created new methods onItemAdded() and onItemSpecAdded() to handle custom events.
import { Component } from '@angular/core';

@Component({
  selector: 'app-root',
  templateUrl: './app.component.html',
  styleUrls: ['./app.component.css']
})
export class AppComponent {
  itemElems = [{type: 'item', title:'Google Pixel', desc:'Android phone by Google', spec:''},
  {type: 'spec', title:'Specifications', desc:'', spec:"Specifications of Google Pixel"}];

  onItemAdded(itemData:{itemTitle: string, itemDesc: string}) {
    this.itemElems.push({
      type: 'item',
      title: itemData.itemTitle,
      desc: itemData.itemDesc,
      spec:''
    });
  }

  onItemSpecAdded(itemSpecData:{itemTitle: string, itemSpec: string}) {
    this.itemElems.push({
      type: 'spec',
      //title: itemSpecData.itemTitle,
      title: 'Specifications',
      desc:'',
      //spec: itemSpecData.itemTitle
      spec: 'Specifications of '+ itemSpecData.itemTitle
    });
  }

}
And the template and typescript files of “create-component” should have the following code.
create-item.component.html
<div class="row">
    <div class="col-xs-12">
      <p>Create Items and Specifications!</p>
      <label>Item Name</label>
      <input type="text" class="form-control" [(ngModel)]="newItemName">
      <label>Item Description</label>
      <input type="text" class="form-control" [(ngModel)]="newItemDesc">
      <br>
      <button
        class="btn btn-primary"
        (click)="onAddItem()">Add Item</button>
      <button
        class="btn btn-primary"
        (click)="onAddItemSpec()">Add Item Specifications</button>
    </div>
  </div>
create-item.component.ts
Create two new properties “itemAdded” and “itemSpecAdded” and use @Output decorator. And make sure that you use EventEmitter along with @Output decorator so that both properties can emit events as shown below. And methods onAddItem() and onAddItemSpec() are moved from app component with the following logic.
import { Component, OnInit, EventEmitter, Output } from '@angular/core';

@Component({
  selector: 'app-create-item',
  templateUrl: './create-item.component.html',
  styleUrls: ['./create-item.component.css']
})
export class CreateItemComponent implements OnInit {

  @Output() itemAdded = new EventEmitter<{itemTitle: string, itemDesc: string}>();
  @Output() itemSpecAdded = new EventEmitter<{itemTitle: string, itemSpec: string}>();

  newItemName = '';
  newItemDesc = '';
  newItemSpec = '';

  constructor() { }

  ngOnInit(): void {
  }

  onAddItem() {
    this.itemAdded.emit({
        itemTitle: this.newItemName,
        itemDesc: this.newItemDesc
    });
  }

  onAddItemSpec() {
    this.itemSpecAdded.emit({
      itemTitle: this.newItemName,
      itemSpec: this.newItemSpec
    });
  }

}
The “item-element” component template and typescript files should have the following logic.
item-element.component.html
Here we had moved individual item element specific logic from app.component.html.
<div
class="panel panel-default">
<div class="panel-heading">{{ itemElem.title }}</div>
<div class="panel-body">
  <p>
    <strong *ngIf="itemElem.type === 'item'" style="color: orange">{{ itemElem.desc }}</strong>
    <em *ngIf="itemElem.type === 'spec'">{{ itemElem.spec }}</em>
  </p>
</div>
</div>
item-element.component.ts
Create custom property and expose “itemElem” property to other components using @Input decorator and define the type as shown below. This represents an item element.
import { Component, Input, OnInit } from '@angular/core';

@Component({
  selector: 'app-item-element',
  templateUrl: './item-element.component.html',
  styleUrls: ['./item-element.component.css']
})
export class ItemElementComponent implements OnInit {

  @Input('itemElement') itemElem : {type: string, title: string, desc: string, spec: string};

  constructor() { }

  ngOnInit(): void {
  }

}
Finally, you had modularized angular application – Angular 9 code. Therefore, you had split single app component to multiple components. And each component could communicate each other which is more important when you modularize angular application.
That’s it. When you run the modified modularized angular application, you should be able to see the same output.
Hope it helped 🙂
Also See:
- Difference between declarations, providers, bootstrap and imports in @NgModule ?
- Best way to bundle an angular app for production deployment ?
- Type cannot be used as an index type.
- Declare model class and use in Angular component : Typescript
- Set default value in the dropdown list in Angular 9
- Best way to delete components in Angular 9 with CLI ?
- Create custom events and fire in Angular 9 with EventEmitter – Example
- ERROR in multi /bootstrap.min.css ./src/styles.css in Angular 9
- Get index of ngFor element using index as value in attribute
- Dynamic and conditional CSS classes with ngClass : Angular
- Apply CSS style attribute dynamically with ngStyle : Angular 9
- This version of CLI is only compatible with Angular versions
- Global Angular CLI version is greater than your local version
- Display different colors for odd/even rows using ngFor loop and ngClass
- TrackBy with *ngFor in Angular 9 : Example
- Angular 9 : Can’t bind to ‘itemElem’ since it isn’t a known property of