Create custom events and fire in Angular 9 with EventEmitter – Example
This tutorial guides you on how to create custom events and fire them in Angular 9 with example. In Angular custom events can be created with EventEmitter.
Create custom events and fire in Angular 9 with EventEmitter
To create custom events in Angular you need to use Angular EventEmitter to create an EventEmitter and expose it as a property as shown below.
@Output() refreshRequest = new EventEmitter<boolean>();
Then use that EventEmitter property to call method EventEmitter.emit(payload) to fire an event as shown below.
this.refreshRequest.emit(refreshed);
The server.component.ts child component class which uses EventEmitter to emit events will look like below.
import { Component, OnInit, EventEmitter, Input, Output } from '@angular/core';
---
---
export class ServerComponent implements OnInit {

    //Create an EventEmitter Property - TypeScript property
    @Output() refreshRequest = new EventEmitter<boolean>();

    onRefresh(refreshed: boolean){
        //fire event
        this.refreshRequest.emit(refreshed);
        ---
        ---
    }

}
Note, parent component (app.component.html) will listen for these events from child component by binding to this property and access payload through the $event object.
<app-server (refreshRequest)="restartServer($event)"></app-server>

<label [style.display]="displayNone">Servers Restarting....</label>
The app.component.ts will look like below.
export class AppComponent {

  displayNone = 'none';

  restartServer(event:Event){

    this.displayNone = this.displayNone?'':'none';

   }

}
In the below code sneppet from child component template (server.component.html), it has a button to refresh server and it responds to user actions.
<button class="btn btn-primary" [disabled]="isServerRefreshed" (click)="onRefresh(true)">Refresh</button>
When user clicks “Refresh” button it raises an event reporting to user’s refresh request.
onRefresh(refreshed: boolean){
    //fire event
    this.refreshRequest.emit(refreshed);
    ---
    ---
}
The below is the code sneppet from parent component template (app.component.html). It defines a refreshRequest property that returns an EventEmitter. When user clicks refresh button, the child component invokes OnRefresh() method, telling EventEmitter to emit refreshRequest event.
Now, parent component (app.component.html) binding to refreshRequest event of the child component (server.component.html). When the refreshRequest event fires I tried to show the label “Servers Restarting….” otherwise it would be hidden by default.
<app-server (refreshRequest)="restartServer($event)"></app-server>

<label [style.display]="displayNone">Servers Restarting....</label>
Use of an EventEmitter Angular with Example
As explained above the main purpose or use of an EventEmitter in Angular is to create custom events and fire them as per your requirement. The following is the complete example step by step which demonstrates an usage of EventEmitter in Angular.
First, Let’s create a new child component (server.component.ts) as shown below
server.component.ts
import { Component, OnInit, EventEmitter, Input, Output } from '@angular/core';

@Component({

	selector:'app-server',
	templateUrl:'./server.component.html'
})

export class ServerComponent implements OnInit {

	serverRefreshStatus: string;
	serverId: number;
	serverStatus: string = 'online';

	@Output() refreshRequest = new EventEmitter<boolean>();
	isServerRefreshed = false;


	constructor() {

            console.log('Inside ServerComponent class constructor');
            this.serverRefreshStatus = 'Server was not refreshed!';
            this.serverId = 10;

	}

	ngOnInit() {

            console.log('Component has been initialized');

	}

	getServerStatus(){

		return this.serverStatus;
	}

	onRefresh(refreshed: boolean){
		this.refreshRequest.emit(refreshed);
		this.isServerRefreshed = true;
		this.serverRefreshStatus = 'Server Refreshed!';
		this.serverStatus = "refreshed and restarted"
	}


}
Next, let’s create server.component.html template or HTML view as shown. This view has a button to refresh server and it responds to user actions.
<p>{{'Server'}} with ID {{serverId}} is {{getServerStatus()}}</p>
<p>{{ serverRefreshStatus }}</p>
<button class="btn btn-primary" [disabled]="isServerRefreshed" (click)="onRefresh(true)">Refresh</button>
Now, let’s modify our app.component.ts (root/parent component) as shown below.
app.component.ts
import { Component } from '@angular/core';

@Component({
  selector: 'myapp-root',
  templateUrl: './app.component.html',
  styles:[`
  	h3{
  		color:red;
  	}
  `]
})
export class AppComponent {

  displayNone = 'none';

  restartServer(event:Event){

    console.log('Restarting server...');
    console.log(event);
    this.displayNone = this.displayNone?'':'none';

   }

}
Finally, modify your app component template (app.component.html) like below.
app.component.html
<div class="container">
	<div class="row">
		<div class="col-xs-12">
			<h3>My First Component !</h3>
			<hr>
			<app-server (refreshRequest)="restartServer($event)"></app-server>
			<p></p>
			<p>
				<label [style.display]="displayNone">Servers Restarting....</label>
			</p>
		</div>
	</div>
</div>
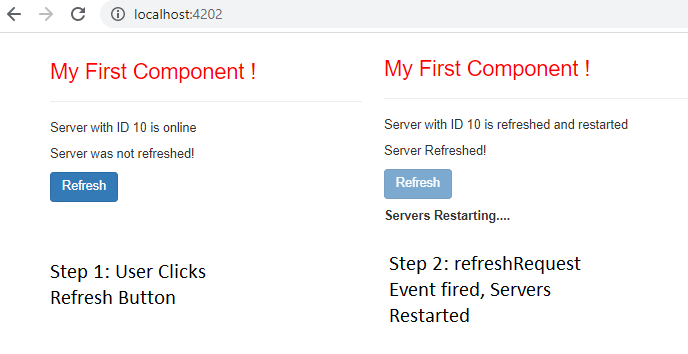
That’s it, now try to run this code to observe the following behavior; when user clicks refresh button the server will be refreshed and restarted (upon refreshRequest event is fired). When the refreshRequest event is fired the label “Servers Restarting….” will be shown, otherwise it would be hidden by default.
Output
That’s it hope it helped 🙂
Also See: