Angular 9 Two-Way Data Binding – Example
This tutorial explains what is two-way data binding in Angular 9 and how it is different from one-way data binding. Let’s also see how to implement two-way data binding in Angular 9.
What is Data Binding ?
Data binding is a technique to perform synchronization or communication between typescript code (Data Model -Business Logic) of your angular component and the template code (HTML View).
By binding a variable you are telling Angular framework to watch for changes and take care of updating HTML view accordingly. There are two types of data binding available. They are one-way data binding (Please check String Interpolation, Property Binding, Event Binding) and two-way data binding as represented in the following diagram.
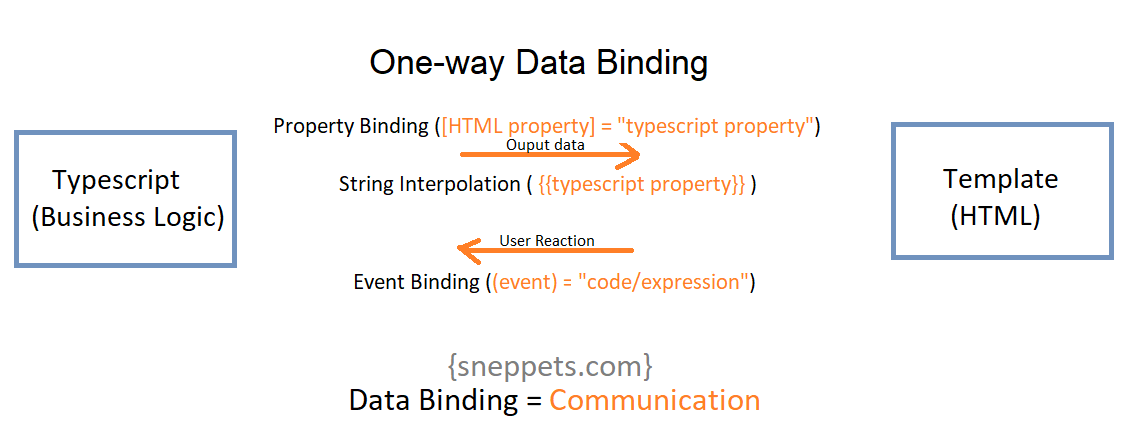
What is One-Way Data Binding ?
One-way data binding allows communication only in one-way or one-direction as represented in the following diagram.
Using Property Binding and String Interpolation techniques you can output data from data model (typescript code) to HTML view (template). Similarly using Event Binding technique you can let communication happen from the HTML view to the typescript class when event (user-initiated) occurs in the template.
What is Two-way Data Binding ?
Two-way data binding allows you to communicate from typescript class to HTML view and vice versa i.e., the combination of both ways that’s represented in the above diagram. In two-way data binding automatic synchronization of data takes place between data model and the HTML view. Hence, the changes would be observed on the both sides.
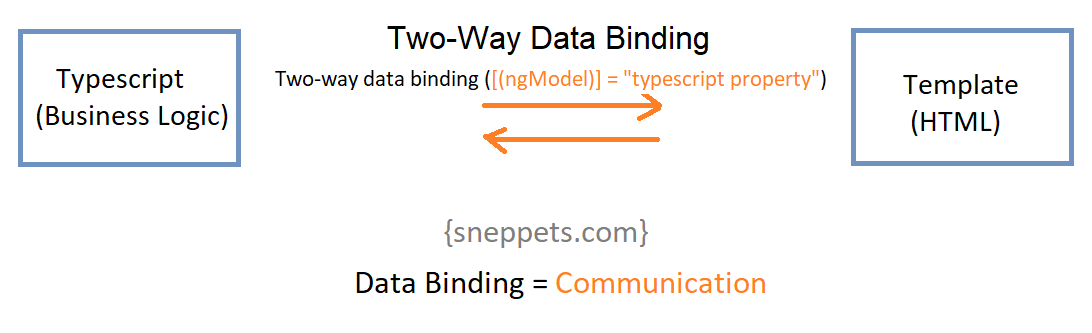
In this approach it is always ensured that typescript code and HTML view is updated all the time immediately and automatically. The ngModel directive can be used to implement two-way data binding in Angular.
Two-way data binding combines property binding and event binding. Therefore, we combine the syntax’s to include both square brackets and parenthesis “[(ngModel)]”, then used ngModel directive within the parenthesis.
This syntax will help in triggering input event (HTML) and update the value of typescript property in component class automatically. On the other-hand, since it is two-way data binding it will also update the value of HTML input element if we change the typescript property value somewhere else in the code.
Syntax:
[(ngModel)] = "typescript property"
Important: FormsModule is required for Two-Way Data Binding
To use ngModel directive for Two-Way data binding implementation, you need to enable it by adding the FormsModule to the imports[] array in the AppModule. And FormsModule need to imported from @angular/forms in the app.module.ts file.
For example, app.module.ts file looks like below.
import { BrowserModule } from '@angular/platform-browser';
import { FormsModule } from '@angular/forms';
import { NgModule } from '@angular/core';


import { AppComponent } from './app.component';
import { ServerComponent } from './server/server.component';

@NgModule({
  declarations: [
    AppComponent,
    ServerComponent
  ],
  imports: [
    BrowserModule,
    FormsModule
  ],
  providers: [],
  bootstrap: [AppComponent]
})
export class AppModule { }
Example – Two-Way Data Binding Angular 9
As explained above first, enable ngModel directive by adding FormsModule in AppModule.
The below template is an example for usage of ngModel for two-way data binding.
server.component.html
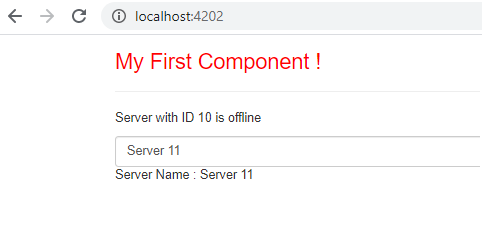
<p>{{'Server'}} with ID {{serverId}} is {{getServerStatus()}}</p>
<input
type="text"
class="form-control"
[(ngModel)]="serverName">  <!-- Two-Way binding-->
<p>Server Name : {{ serverName }}</p>
And our component class (typescript file) server.component.ts looks like below.
import { Component, OnInit, EventEmitter, Input, Output } from '@angular/core';

@Component({

	selector:'app-server',
	templateUrl:'./server.component.html'
})

export class ServerComponent implements OnInit {

	serverId: number = 10;
	serverStatus: string = 'offline';
	serverName = 'Server 11'; //Two-Way binding demonstration

	constructor() {

	}

	ngOnInit() {

	   console.log('Component has been initialized');

	}

	getServerStatus(){

		return this.serverStatus;
	}

}
When the page is loaded for the first time the Input element in the form control will get updated or pre-populated automatically i.e., the value of the HTML input element (text box) is populated with the value of the typescript parameter “ServerName” initialized which is “Server 11“.
This is nothing but property binding technique.
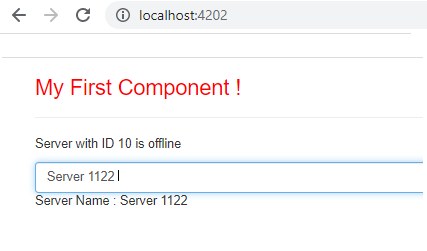
On the other hand, when user trigger input event (via typing in text box), it will update the value of the typescript property in the component class automatically. Hence it updates the value of String Interpolation “{{ serverName }}“.
Here we could see that event binding technique is used.
Hope it helped you in understanding what two-way data binding is 🙂
Also See:
- HTML Property Binding in Angular : Data Binding
- Angular 9 : ngFor loop with index, first and last element: Example
- How to include Bootstrap to your Angular 9 Project ?
- Store access token in Ionic Angular App local storage securely
- Angular TypeScript Vs ES6 Vs ES5
- How to change angular port from 4200 to some other port ?
- Port 4200 is already in use while running ng serve Angular CLI command
- String Interpolation in Angular 9
- This version of CLI is only compatible with Angular versions
- Your global Angular CLI version is greater than your local version
- Difference between Constructor and ngOnInit in Angular 9
- Create custom events and fire in Angular 9 with EventEmitter – Example