How to Deploy an Application to Kubernetes running on Google Cloud Kubernetes Engine (GKE)
In this article you will learn how to deploy a simple java application to Kubernetes running on Google Cloud Kubernetes Engine (GKE). Kubernetes is an open-source container orchestration system for automating the application deployment, scaling and management.
Google Kubernetes Engine Lab Exercise – Objective
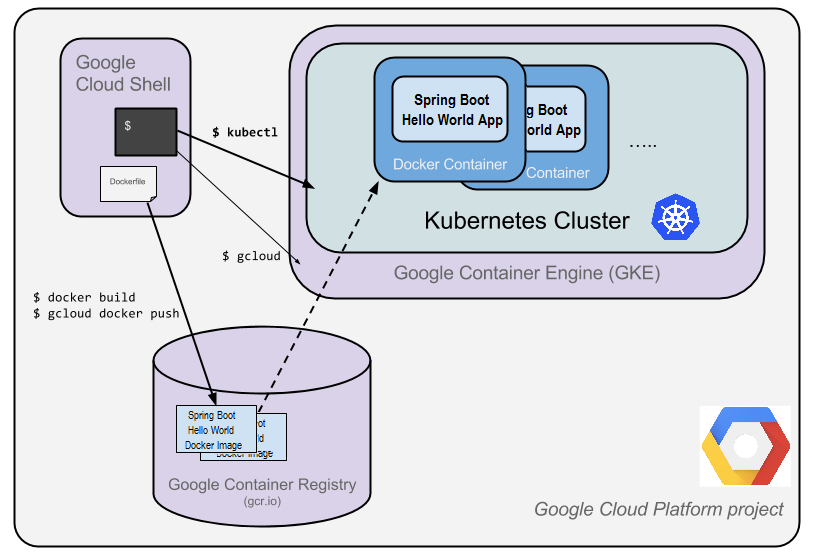
The objective of this exercise is to run our web application (that is developed in our local machine or from Git source repository) as a replicated application running on Kubernetes cluster in the Google Container Engine or Google Kubernetes Engine (GKE).
What you need to do is, just take the code, turn it into Docker container image, and then run that image on Google Kubernetes Engine.
What is Google Container Registry?
Google Container Registry is a single place where you can store, manage and secure your Docker container images.
Docker is computer program that helps in performing OS level virtualization. It is used to run software packages called Containers. Docker Containers are isolated from each other and bundle their own application, libraries configuration files etc., and then communication between Docker Containers can happen only through well-defined channels. Containers are created using Images.
What is Google Kubernetes Engine (GKE)?
Google Kubernetes Engine is a managed, production-ready environment for deploying containerized applications. In simple terms Kubernetes Engine is a Google-hosted version of Kubernetes running on Compute Engine.
When you use Kubernetes Engine to run your applications, you no need to worry about how to install, manage and operate your own Kubernetes Clusters as Kubernetes Engine allows you to do those stuff in no time.
Now let’s see how to deploy simple application to kubernetes on Google Kubernetes Engine.
1. Get source code from Git repository
For our lab exercise let’s use sample source code from Github. Launch the cloud shell and run the following git command to clone the Spring Boot Hello World source code in the home directory.
sneppets@cloudshell:~ (gcp-sneppets)$ git clone https://github.com/spring-guides/gs-spring-boot.git
Cloning into 'gs-spring-boot'...
remote: Enumerating objects: 6, done.
remote: Counting objects: 100% (6/6), done.
remote: Compressing objects: 100% (6/6), done.
remote: Total 1170 (delta 1), reused 1 (delta 0), pack-reused 1164
Receiving objects: 100% (1170/1170), 483.27 KiB | 264.00 KiB/s, done.
Resolving deltas: 100% (781/781), done.

sneppets@cloudshell:~ (gcp-sneppets)$ ls
gs-spring-boot  README-cloudshell.txt
2. Run and test the application locally
Once you had cloned the example source code in the home directory, change the current directory to ‘gs-spring-boot/complete‘ and start the Spring Boot Hello World App normally using the Spring Boot plugin as shown below.
sneppets@cloudshell:~ (gcp-sneppets)$ cd gs-spring-boot/complete/

sneppets@cloudshell:~/gs-spring-boot/complete (gcp-sneppets)$ ls
build.gradle  gradle  gradlew  gradlew.bat  mvnw  mvnw.cmd  pom.xml  src  target

sneppets@cloudshell:~/gs-spring-boot/complete (gcp-sneppets)$ ./mvnw -DskipTests spring-boot:run
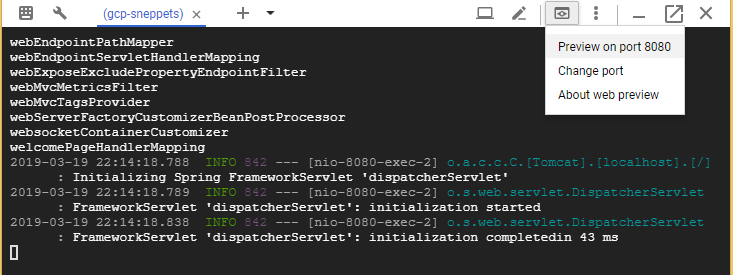
Once the application is started, click on the web preview icon in the cloud shell toolbar and choose “preview on port 8080” from the drop down
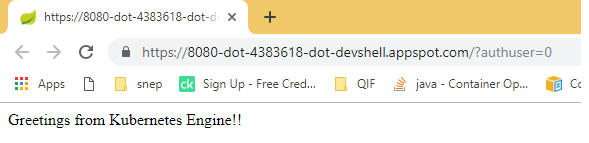
Then it will open an URL in new tab in the browser, connects to the server that you had started and displays the following output.
3. Package the application as a Docker Container
Next step is to you need to create the JAR deployable for the application and use the Jib to create the container image and push the image to Google Container Registry.
sneppets@cloudshell:~/gs-spring-boot/complete (gcp-sneppets)$ ./mvnw -DskipTests package
[INFO] Scanning for projects...
[INFO]
[INFO] ------------------------------------------------------------------------
[INFO] Building gs-spring-boot 0.1.0
[INFO] ------------------------------------------------------------------------
........................
........................
[INFO] --- spring-boot-maven-plugin:2.0.5.RELEASE:repackage (default) @ gs-spring-boot ---
[INFO] ------------------------------------------------------------------------
[INFO] BUILD SUCCESS
[INFO] ------------------------------------------------------------------------
[INFO] Total time: 5.663 s
[INFO] Finished at: 2019-03-19T22:28:39+05:30
[INFO] Final Memory: 22M/53M
[INFO] ------------------------------------------------------------------------
sneppets@cloudshell:~/gs-spring-boot/complete (gcp-sneppets)$ ./mvnw -DskipTests com.google.cloud.tools:jib-maven-plugin:build -Dimage=gcr.io/$GOOGLE_CLOUD_PROJECT/hello-spring:v1
[INFO] Scanning for projects...
[INFO]
[INFO] ------------------------------------------------------------------------
[INFO] Building gs-spring-boot 0.1.0
[INFO] ------------------------------------------------------------------------
[INFO]
[INFO] --- jib-maven-plugin:1.0.2:build (default-cli) @ gs-spring-boot ---
[INFO]
[INFO] Containerizing application to gcr.io/gcp-sneppets/hello-spring:v1...
[INFO]
[INFO] Container entrypoint set to [java, -cp, /app/resources:/app/classes:/app/libs/*, hello.Application]
[INFO]
[INFO] Built and pushed image as gcr.io/gcp-sneppets/hello-spring:v1
[INFO] Executing tasks:
[INFO] [==============================] 100.0% complete
[INFO]
[INFO] ------------------------------------------------------------------------
[INFO] BUILD SUCCESS
[INFO] ------------------------------------------------------------------------
[INFO] Total time: 25.209 s
[INFO] Finished at: 2019-03-19T22:34:27+05:30
[INFO] Final Memory: 23M/56M
[INFO] ------------------------------------------------------------------------
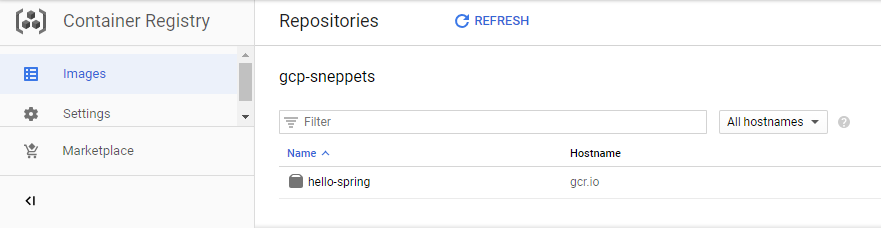
Once the image is successfully built and pushed to gcr.io (Google Container Registry), then you could manually check whether the container image is listed in the console as shown below. Note, at this point this hello-spring image is project-wide Docker image.
You can also test the image locally using the following Docker command. This command will run a Docker container as a daemon on port 8080 from your newly created container image. You can use web preview feature of CloudShell to see the output.
sneppets@cloudshell:~/gs-spring-boot/complete (gcp-sneppets)$ docker run -ti --rm -p 8080:8080 gcr.io/$GOOGLE_CLOUD_PROJECT/hello-spring:v1
You can stop running container by entering “Ctrl+c”
4. Create your Kubernetes Engine Cluster
Navigate to Google Kubernetes Engine section in the console and wait for few seconds for the system to initialize.
Google Cloud Console -> Kubernetes Engine (Left Navigation Panel)
A cluster consists of a Kubernetes master server managed by Google and set of worker nodes. The worker nodes here are nothing but Google Compute Engine VM’s. Let’s use gcloud command to create kubernetes engine cluster as shown below
sneppets@cloudshell:~/gs-spring-boot/complete (gcp-sneppets)$ gcloud container clusters create hello-spring-cluster \
>  --num-nodes 2 \
>   --machine-type n1-standard-1 \
>   --zone us-central1-c
--------------
--------------
Creating cluster hello-spring-cluster in us-central1-c... Cluster is being deployed..
Creating cluster hello-spring-cluster in us-central1-c... Cluster is being health-checked..
Creating cluster hello-spring-cluster in us-central1-c... Cluster is being (master is healthy)..done
Created
---------------
---------------
NAME                  LOCATION       MASTER_VERSION  MASTER_IP       MACHINE_TYPE   NODE_VERSION  NUM_NODES  STATUS
hello-spring-cluster  us-central1-c  1.11.7-gke.4    104.198.142.74  n1-standard-1  1.11.7-gke.4  2          RUNNING
You should now have fully-functioning Kubernetes Cluster using Google Kubernetes Engine.
5. Deploy your application to Kubernetes
Now, its time to deploy Spring Boot Hello World application to Kubernetes cluster. Let’s use ‘kubectl‘ command line in the CloudShell for Kubernetes deployment.
Kubernetes deployment can create, manage, and scale multiple instances of your application using the container image that you have just created in Container Registry. Run the following kubectl command to deploy one instance of Spring Boot Hello World application into Kubernetes.
$ kubectl run hello-spring \
> --image=gcr.io/$GOOGLE_CLOUD_PROJECT/hello-spring:v1 \
> --port=8080
deployment.apps/hello-spring created
To get the deployments run the following kubectl command
$ kubectl get deployments
NAME           DESIRED   CURRENT   UP-TO-DATE   AVAILABLE   AGE
hello-spring   1         1         1            1           1m
To get the application instances created by the deployment, run the following command
$ kubectl get pods
NAME                            READY     STATUS    RESTARTS   AGE
hello-spring-7b577c49df-qx9sb   1/1       Running   0          2m
Further Learning
- Google Virtual Private Cloud (VPC) Networks Lab Exercise
- GCP Virtual Private Cloud (VPC) Networks Fundamentals
- GCP Virtual Private Network (VPN) Tunnels Lab Example