Event Driven Microservices: Spring Boot + Kubernetes + Docker + Helm + Google Cloud
This tutorial is just a guide on how to deploy and run microservices reference example by Kenny Bastani, which demonstrates the basics of Event Driven Microservices Architecture using Spring Boot, Spring Cloud, Kubernetes, Docker, Helm and Google Cloud stacks.
Microservices on Google Cloud using SpringBoot, Kubernetes, Docker, Helm
This example built was a social network using vent driven microservices architecture. You can refer for more details on the architecture here.
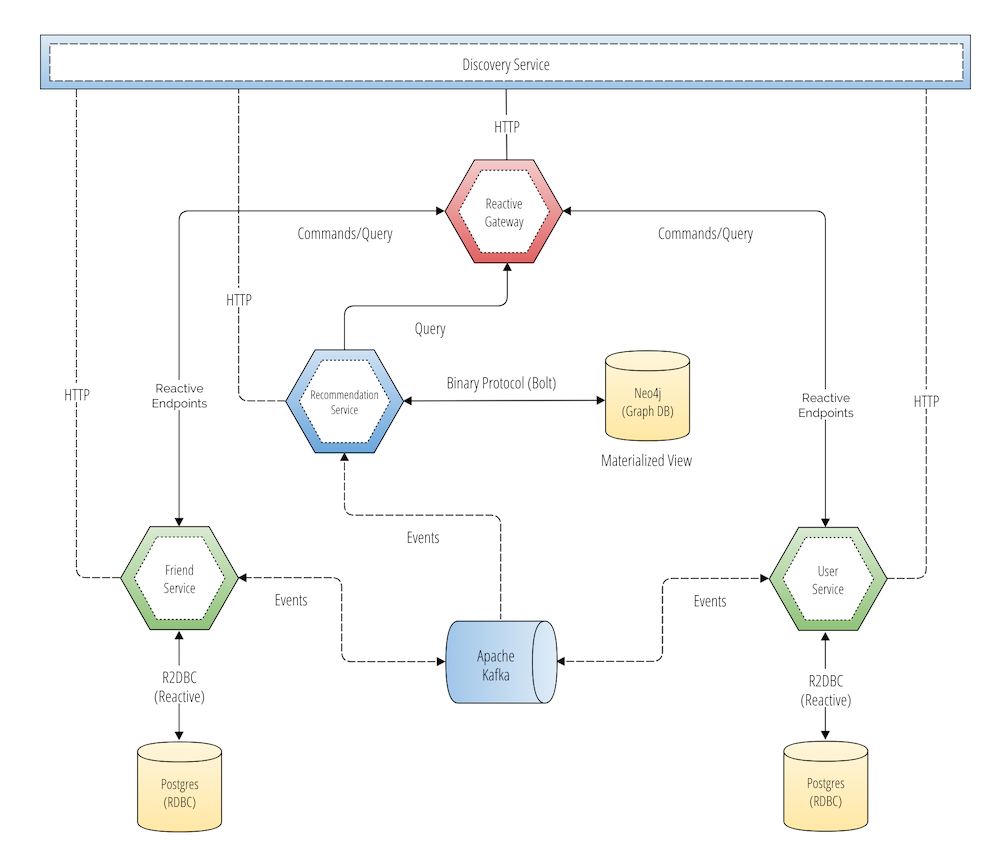
Picture: GitHub kbastani Event Sourcing Microservices Example
The scope of this tutorial is deployment and running of the above microservices example using helm on Google Cloud Platform i.e., Hyperscale Evaluation as mentioned in the tutorial.
Hyperscale Evaluation
This deployment guide is for users who wanted to run this social network example as a hyper-scalable distributed system with a production Kubernetes cluster that is deployed to a public cloud provider like Google Cloud GKE Cluster. You are going to use Helm as a package manager for Kubernetes that can be used to deploy and manage a scale-out distributed system.
Pre-Requisites
Before you start, make sure you have performed the following tasks:
- Ensure that you have enabled the Google Kubernetes Engine API.
- Ensure that you have installed the Cloud SDK.
- Install Helm by following the instructions https://docs.helm.sh/using_helm/#installing-helm.
Deploy and Run Event Driven Microservices on Google Cloud
1. Create Kubernetes Cluster
To create kubernetes cluster
- Go to Kubernetes Engine -> Clusters -> Create Clusters
- Choose Standard Cluster template and mention name (social-network-cluster) of the cluster. Customize the template if needed otherwise you can leave the defaults for the fields Location type, Zone, Region, node pool etc.,
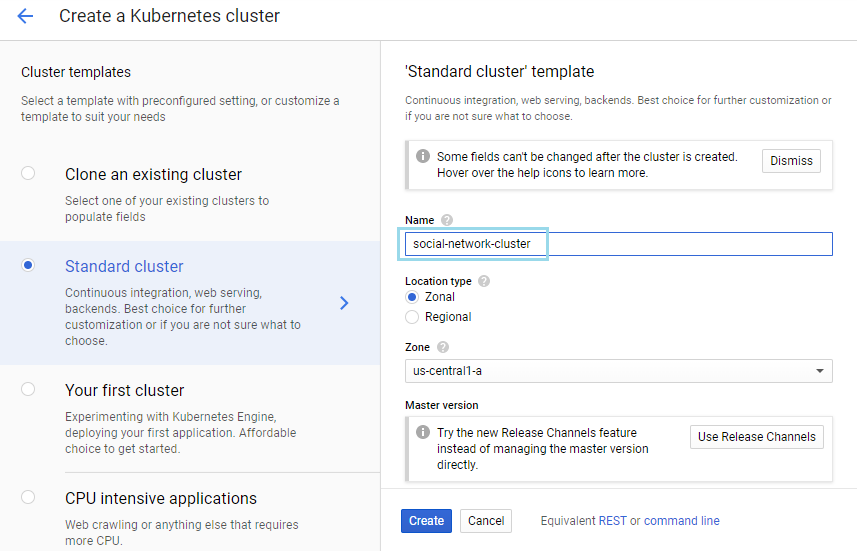
- Click Create
2. Connect to the cluster via command line
You can connect to the cluster via command line or using a dashboard. To configure kubectl command line access you need to run the following command.
$ gcloud container clusters get-credentials social-network-cluster --zone us-central1-a --project sneppets-gcp

Fetching cluster endpoint and auth data.
kubeconfig entry generated for social-network-cluster.
Then you need to check and ensure you have access to the kubernetes cluster by running the following command
$ kubectl get nodes

NAME                                                  STATUS   ROLES    AGE    VERSION
gke-social-network-clust-default-pool-2fb1d5e6-750v   Ready    <none>   7m5s   v1.14.10-gke.17
gke-social-network-clust-default-pool-2fb1d5e6-k2x8   Ready    <none>   7m5s   v1.14.10-gke.17
gke-social-network-clust-default-pool-2fb1d5e6-m6b6   Ready    <none>   7m6s   v1.14.10-gke.17
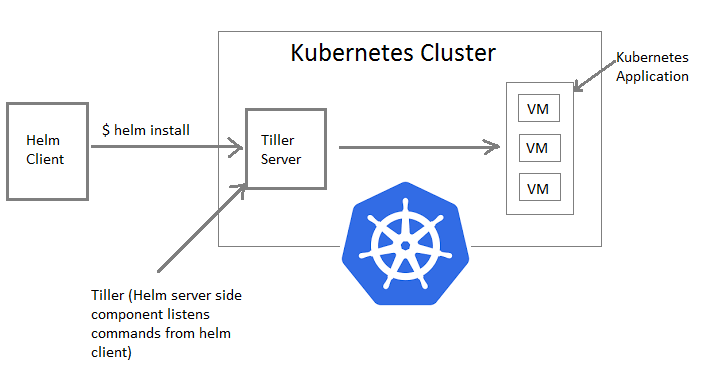
3. Install Helm Tiller (RBAC)
You need to run the following commands to install Tiller (the Helm Server side component) and setup RBAC in to your kubernetes cluster.
$ helm init

$HELM_HOME has been configured at /home/nithip2016/.helm.

Tiller (the Helm server-side component) has been installed into your Kubernetes Cluster.

Please note: by default, Tiller is deployed with an insecure 'allow unauthenticated users' policy.
To prevent this, run `helm init` with the --tiller-tls-verify flag.
For more information on securing your installation see: https://docs.helm.sh/using_helm/#securing-your-helm-installation
$ kubectl --namespace kube-system create serviceaccount tiller

from server (AlreadyExists): serviceaccounts "tiller" already exists
$ kubectl create clusterrolebinding tiller-cluster-rule \
--clusterrole=cluster-admin --serviceaccount=kube-system:tiller

clusterrolebinding.rbac.authorization.k8s.io/tiller-cluster-rule created
$ kubectl --namespace kube-system patch deploy tiller-deploy \
  -p '{"spec":{"template":{"spec":{"serviceAccount":"tiller"}}}}'

deployment.extensions/tiller-deploy patched
$ helm repo update
4. Clone the git code locally
Clone the Event driven social network microservices code from git to your local.
$ git clone https://github.com/kbastani/event-sourcing-microservices-example.git

$ cd event-sourcing-microservices-example
$ ls
deployment         docker-compose.yml  edge-service    LICENSE  README.md               user-service
discovery-service  Dockerfile          friend-service  pom.xml  recommendation-service
5. Add bitnami helm repo
Add the bitnami helm repository which contains the kafka and zookeeper charts.
$ helm repo add bitnami https://charts.bitnami.com

"bitnami" has been added to your repositories

$ helm repo add incubator https://kubernetes-charts-incubator.storage.googleapis.com

"incubator" has been added to your repositories
6. Update dependent charts
You need to run a few helm commands to ensure all dependent charts are available.
$ helm dep update deployment/helm/social-network
$ helm dep update deployment/helm/friend-service
$ helm dep update deployment/helm/user-service
$ helm dep update deployment/helm/recommendation-service
7. Deploy microservices using Helm
Using the above commands/steps Helm and Kubernetes Cluster is all setup. Now its time to deploy the distributed system to kubernetes cluster using the following helm command.
$ helm install --namespace social-network --name social-network --set fullNameOverride=social-network deployment/helm/social-network
Response:

NAME:   social-network
LAST DEPLOYED: Tue Feb 25 12:23:33 2020
NAMESPACE: social-network
STATUS: DEPLOYED

RESOURCES:
==> v1/ClusterRole
NAME                                AGE
social-network-grafana-clusterrole  5s

==> v1/ClusterRoleBinding
NAME                                       AGE
social-network-grafana-clusterrolebinding  5s
----------------------
----------------------
----------------------

==> v1/Pod(related)
NAME                                                          READY  STATUS             RESTARTS  AGE
edge-service-7659dbb6f8-4jvjd                                 0/1    ContainerCreating  0         5s
friend-db-0                                                   0/1    ContainerCreating  0         3s
friend-service-559bdfbb99-7f65d                               0/1    ContainerCreating  0         5s
kafka-0                                                       0/1    ContainerCreating  0         3s
recommendation-service-6877bbfc4b-p5nmz                       0/1    ContainerCreating  0         4s
social-network-grafana-96dbbf87-rwjjv                         0/1    ContainerCreating  0         4s
social-network-neo4j-core-0                                   0/1    Pending            0         3s
social-network-prometheus-kube-state-metrics-86c8c74d9-sxbbm  0/1    ContainerCreating  0         4s
social-network-prometheus-node-exporter-4v49v                 0/1    ContainerCreating  0         5s
social-network-prometheus-node-exporter-lbgrp                 0/1    ContainerCreating  0         4s
social-network-prometheus-node-exporter-z78ld                 0/1    ContainerCreating  0         4s
social-network-prometheus-server-b8d9d948c-gd456              0/2    Init:0/1           0         4s
social-network-zookeeper-0                                    0/1    ContainerCreating  0         3s
user-db-0                                                     0/1    ContainerCreating  0         3s
user-service-8988d7db4-kdlgx                                  0/1    ContainerCreating  0         4s

---------------------
---------------------

==> v1/Service
NAME                                          TYPE       CLUSTER-IP   EXTERNAL-IP  PORT(S)                     AGE
edge-service                                  ClusterIP  10.0.5.218   <none>       9000/TCP                    5s
friend-db                                     ClusterIP  10.0.6.31    <none>       5432/TCP                    5s
friend-db-headless                            ClusterIP  None         <none>       5432/TCP                    5s
friend-service                                ClusterIP  10.0.13.135  <none>       8100/TCP                    5s
kafka                                         ClusterIP  10.0.6.234   <none>       9092/TCP                    5s
kafka-headless                                ClusterIP  None         <none>       9092/TCP                    5s
recommendation-service                        ClusterIP  10.0.15.120  <none>       8110/TCP                    5s
social-network-grafana                        ClusterIP  10.0.6.73    <none>       80/TCP                      5s
social-network-neo4j                          ClusterIP  None         <none>       7474/TCP                    5s
social-network-prometheus-kube-state-metrics  ClusterIP  None         <none>       80/TCP                      5s
social-network-prometheus-node-exporter       ClusterIP  None         <none>       9100/TCP                    5s
social-network-prometheus-server              ClusterIP  10.0.8.62    <none>       80/TCP                      5s
social-network-zookeeper                      ClusterIP  10.0.8.101   <none>       2181/TCP                    5s
social-network-zookeeper-headless             ClusterIP  None         <none>       2181/TCP,3888/TCP,2888/TCP  5s
user-db                                       ClusterIP  10.0.10.203  <none>       5432/TCP                    5s
user-db-headless                              ClusterIP  None         <none>       5432/TCP                    5s
user-service                                  ClusterIP  10.0.5.130   <none>       8120/TCP                    5s

----------------------
----------------------

==> v1beta2/Deployment
NAME                    READY  UP-TO-DATE  AVAILABLE  AGE
friend-service          0/1    1           0          5s
recommendation-service  0/1    1           0          4s
social-network-grafana  0/1    1           0          5s
user-service            0/1    1           0          4s

==> v1beta2/StatefulSet
NAME                       READY  AGE
friend-db                  0/1    4s
social-network-neo4j-core  0/1    3s
user-db                    0/1    3s
Check the status of deployment and the state of the kubernetes cluster use the following command.
$ kubectl get pods -n social-network

Response:
--------------
NAME                                                           READY   STATUS    RESTARTS   AGE
edge-service-7659dbb6f8-4jvjd                                  1/1     Running   0          7m7s
friend-db-0                                                    1/1     Running   0          7m5s
friend-service-559bdfbb99-7f65d                                1/1     Running   0          7m7s
kafka-0                                                        1/1     Running   1          7m5s
kafka-1                                                        1/1     Running   0          4m29s
kafka-2                                                        1/1     Running   0          3m32s
recommendation-service-6877bbfc4b-p5nmz                        1/1     Running   0          7m6s
social-network-grafana-96dbbf87-rwjjv                          1/1     Running   0          7m6s
social-network-neo4j-core-0                                    1/1     Running   0          7m5s
social-network-prometheus-kube-state-metrics-86c8c74d9-sxbbm   1/1     Running   0          7m6s
social-network-prometheus-node-exporter-4v49v                  1/1     Running   0          7m7s
social-network-prometheus-node-exporter-lbgrp                  1/1     Running   0          7m6s
social-network-prometheus-node-exporter-z78ld                  1/1     Running   0          7m6s
social-network-prometheus-server-b8d9d948c-gd456               2/2     Running   0          7m6s
social-network-zookeeper-0                                     1/1     Running   0          7m5s
social-network-zookeeper-1                                     1/1     Running   0          5m47s
social-network-zookeeper-2                                     1/1     Running   0          5m9s
user-db-0                                                      1/1     Running   0          7m5s
user-service-8988d7db4-kdlgx                                   1/1     Running   0          7m6s
8. Run the App.
In this sample application edge-service is used as API Gateway (Spring Cloud Gateway) used to access REST APIs exposed by different microservices. You need to do port forwarding using kubectl port-forward command to access the application as shown below.
$ kubectl --namespace social-network port-forward svc/edge-service 9000

Response:
-----------
Forwarding from 127.0.0.1:9000 -> 9000
You can run the following scripts (generate-parallel.sh & generate-serial.sh) to add test users and friend relationships to the social network. Let’s use genereate-serial.sh script to generate some users and friend relationship data in the database as shown below.
/event-sourcing-microservices-example/deployment/sbin (sneppets-gcp)$ ls
generate-parallel.sh  generate-serial.sh  names-100.txt  names-15.txt

$ sh ./generate-serial.sh

Using edge-service URI: localhost:9000
--> Wake up user service... "UP"
--> Wake up friend service..."UP"
--> Wake up recommendation service..."UP"
====> Create users
{
  "firstName": "Andrew",
  "lastName": "Rutherford",
  "createdAt": "2020-02-25T07:17:25.890+0000",
  "lastModified": "2020-02-25T07:17:25.890+0000",
  "id": 1
}
{
  "firstName": "Andrew",
  "lastName": "Parr",
  "createdAt": "2020-02-25T07:17:27.184+0000",
  "lastModified": "2020-02-25T07:17:27.184+0000",
  "id": 2
}
{
  "firstName": "Emily",
  "lastName": "Morgan",
  "createdAt": "2020-02-25T07:17:27.894+0000",
  "lastModified": "2020-02-25T07:17:27.894+0000",
  "id": 3
}
{
  "firstName": "Kevin",
  "lastName": "Bailey",
  "createdAt": "2020-02-25T07:17:28.590+0000",
  "lastModified": "2020-02-25T07:17:28.590+0000",
  "id": 4
}

-------------
-------------
-------------

====> Create 100 friendships...
10 ❤ 14
{
  "id": 1,
  "userId": 10,
  "friendId": 14,
  "createdAt": "2020-02-25T07:21:18.758+0000",
  "updatedAt": "2020-02-25T07:21:18.758+0000"
}
7 ❤ 8
{
  "id": 2,
  "userId": 7,
  "friendId": 8,
  "createdAt": "2020-02-25T07:21:20.098+0000",
  "updatedAt": "2020-02-25T07:21:20.098+0000"
}

------------
------------
------------
Now, let us test few simple API’s like below that are exposed by the gateway.
Get User
GET http://localhost:9000/user/v1/users/{0}
$ curl  http://localhost:9000/user/v1/users/20

Response:
----------
{
 "firstName":"Andrew",
 "lastName":"Parr",
 "createdAt":"2020-02-25T07:22:31.238+0000",
 "lastModified":"2020-02-25T07:22:31.238+0000",
 "id":20
}
Find Friends
GET http://localhost:9000/friend/v1/users/{0}/friends
$ curl  http://localhost:9000/friend/v1/users/20/

Response:
---------
[
 {
   "id":6,
   "userId":20,
   "friendId":19,
   "createdAt":"2020-02-25T07:22:39.969+0000",
   "updatedAt":"2020-02-25T07:22:39.969+0000"
  }
]
Congratulations, you had successfully deployed the distributed system on Google Cloud and could generate some sample data and test few REST API’s.
9. Metrics and Monitoring
Run the following command to access grafana for visualizing the aggregated metrics. Note, metrics of each microservices application are forwarded to a prometheus gateway, which is responsible for aggregating all the metrics.
$ gcloud container clusters get-credentials social-network-cluster --zone us-central1-a --project sneppets-gcp \
>  && kubectl port-forward --namespace social-network $(kubectl get pod --namespace social-network \
> --selector="app=grafana,release=social-network" --output jsonpath='{.items[0].metadata.name}') 8080:3000

Response:
----------
Fetching cluster endpoint and auth data.
kubeconfig entry generated for social-network-cluster.
Forwarding from 127.0.0.1:8080 -> 3000
Handling connection for 8080
Now, you can access Grafana via browser using “Open in web preview” option in Google Cloud Platform Dashboard/Console and enter the following credentials (username: admin, password: password) to login.
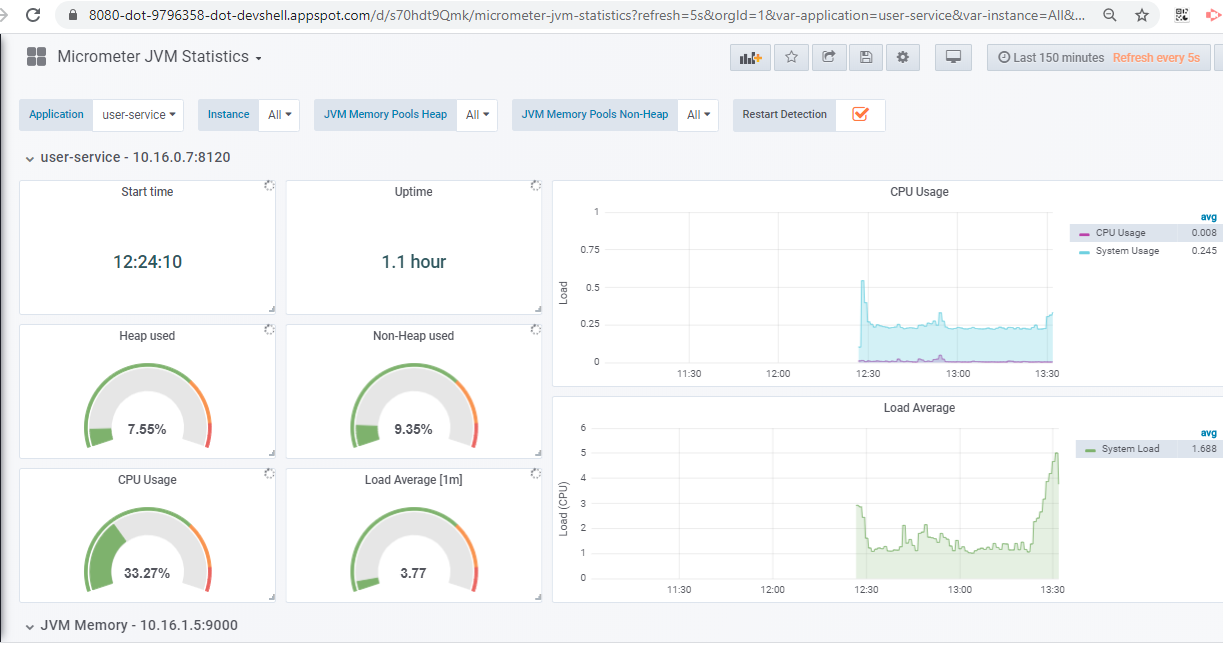
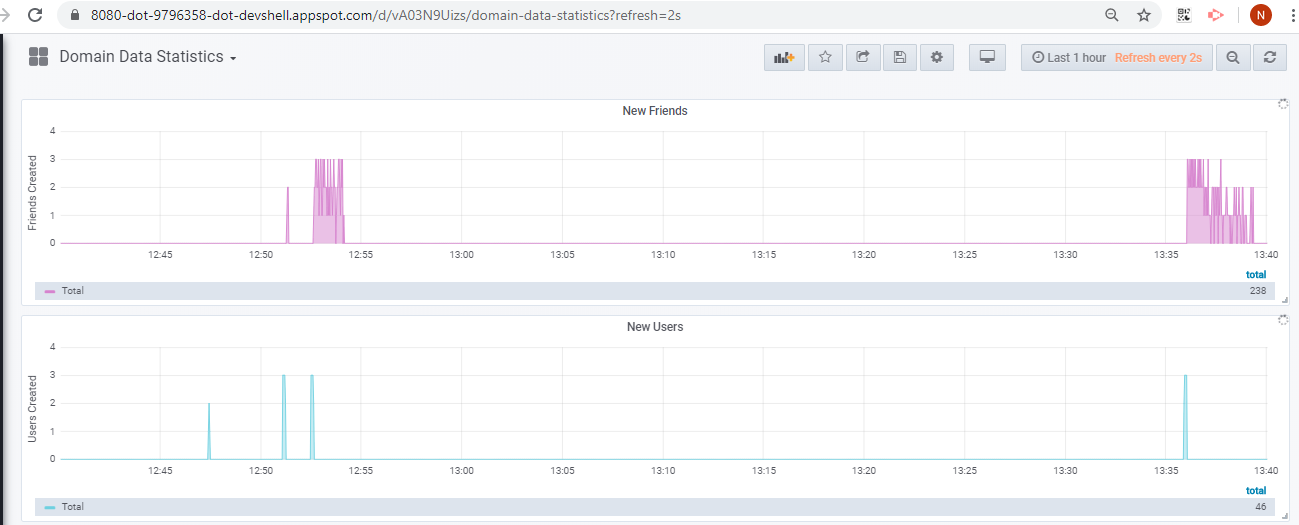
You can also navigate to “Domain Data Statistics” to check how the cluster is able to handle the requests for creating new users and new friends.
10. Clean Up
You need to run the following commands to uninstall the applications (services)
$ helm delete --purge social-network

Response:
---------
release "social-network" deleted

$ kubectl delete pvc datadir-social-network-neo4j-core-0 -n social-network

Response:
---------
persistentvolumeclaim "datadir-social-network-neo4j-core-0" deleted
Finally, delete the kubernetes cluster that you have created from Google Cloud Platform Console.
Also See:
- Visualize Big Data using Google Data Studio.
- Google Compute Engine Introduction and Features
- How to create GCP project on Google Cloud Platform ?
- Kubernetes Error : did you specify the right host or port ?