Angular 9 img src binding in ngFor loop : Example
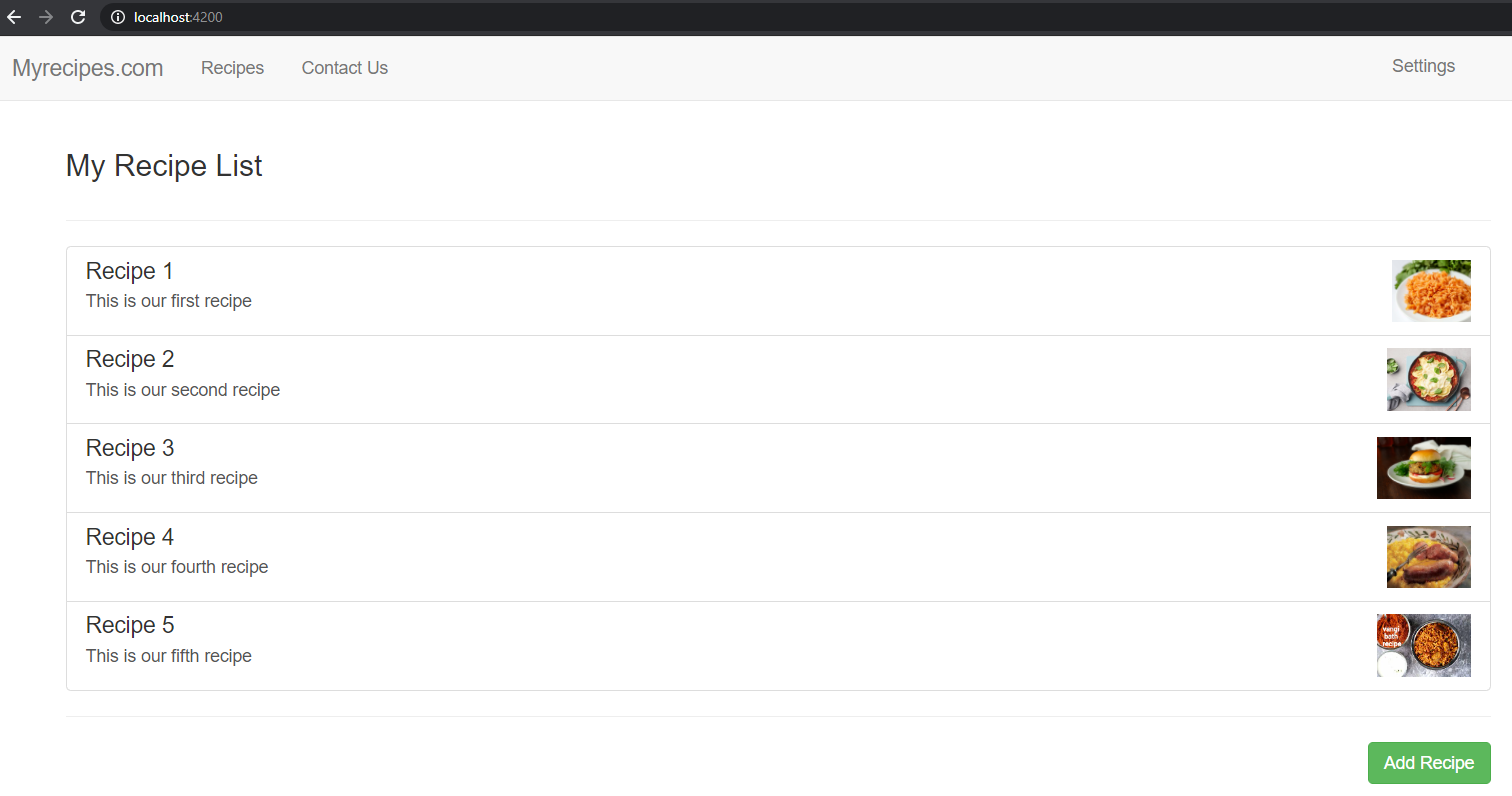
This tutorial guides you on Angular 9 img src binding in ngFor loop. Let’s see an example, where we list recipes and each row will have recipe preview thumbnail image on the right side and let’s see how we bind img src property in ngFor loop dynamically.
Angular 9 img src binding in ngFor loop
There are two ways to do img src binding in ngFor loop in Angular. You can use any one of the following ways.
You can use a template expression as shown below. In this example we are binding src property of an image element to a component’s imagePath property.
<img [src] = "recipe.imagePath" />
You can also use string interpolation as shown in the example below.
<img src = {{recipe.imagePath}} />
Let’s see a realtime example for how to implement img src binding in ngFor loop in Angular 9 application.
Example : Angular 9 img src binding in ngFor loop
The following Myrecipes.com website has recipe list component which lists recipes in rows and each row will have thumbnail image to preview the recipe. This thumbnail preview image is the result of img src binding in ngFor loop. Let’s see how to implement the same.
The recipe list component should have the following lines of code. Here we followed the template expression way <img [src] = “recipe.imagePath” /> in ngFor loop as shown below.
recipe-list.component.html
<div class="row">
    <div class="col-xs-12">
        <div class="pull-left">
            <h3>My Recipe List</h3>
        </div>
    </div>
</div>
<hr>
<div class="row">
    <div class="col-xs-12">
        <a href="#"
           class="list-group-item clearfix"
           *ngFor="let recipe of recipes">
            <div class="pull-left">
                <h4 class="list-group-item-heading">{{ recipe.name }}</h4>
                <p class="list-group-item-text">{{ recipe.description }}</p>
            </div>
            <span class="pull-right">
                <img
                     [src] = "recipe.imagePath"
                     alt="{{ recipe.name }}"
                     class="img-responsive"
                     style="max-height: 50px;">
            </span>
        </a>
    </div>
</div>
<hr>
<div class="row">
    <div class="col-xs-12">
        <div class="pull-right">
            <button class="btn btn-success">Add Recipe</button>
        </div>
    </div>
</div>
Then, the recipe list component class should have the following lines of code. Note, the recipe imagePath URL’s I have taken from internet through Google search.
recipe-list.component.ts
import { Component, OnInit } from '@angular/core';
import { Recipe } from '../recipe.model';

@Component({
  selector: 'app-recipe-list',
  templateUrl: './recipe-list.component.html',
  styleUrls: ['./recipe-list.component.css']
})
export class RecipeListComponent implements OnInit {

  recipes: Recipe[] = [
    new Recipe('Recipe 1', 'This is our first recipe', 'https://lillunacom/wp-content/uploads/2017/10/spanish-rice-resize-6.jpg'),
    new Recipe('Recipe 2', 'This is our second recipe', 'https://foodfnrsndimgcom/content/dam/images/food/fullset/2020/07/14/0/FNK_20-Minute-Sausage-And-Pepper-Ravioli-Skillet_H_s4x3.jpg.rend.hgtvcom.441.331.suffix/1594757098344.jpeg'),
    new Recipe('Recipe 3', 'This is our third recipe', 'https://imagessquarespace-cdncom/content/v1/5c089f01f93fd410a92e642a/1589512502567-CNOAIL05BVT1TI0422P2/ke17ZwdGBToddI8pDm48kLkXF2pIyv_F2eUT9F60jBl7gQa3H78H3Y0txjaiv_0fDoOvxcdMmMKkDsyUqMSsMWxHk725yiiHCCLfrh8O1z4YTzHvnKhyp6Da-NYroOW3ZGjoBKy3azqku80C789l0iyqMbMesKd95J-X4EagrgU9L3Sa3U8cogeb0tjXbfawd0urKshkc5MgdBeJmALQKw/pheasant+back+burger+recipe.jpeg'),
    new Recipe('Recipe 4', 'This is our fourth recipe', 'https://encrypted-tbn0gstaticcom/images?q=tbn%3AANd9GcQunf0MIpWZn3rjR-mo4u9_HKsL0Ud3SV8WTQ&usqp=CAU'),
    new Recipe('Recipe 5', 'This is our fifth recipe', 'https://encrypted-tbn0gstaticcom/images?q=tbn%3AANd9GcQ_9l39e7G5y_ENz6hL6l5KhaJuroOrbzqs0Q&usqp=CAU')
  ];

  constructor() { }

  ngOnInit(): void {
  }

}
And your recipe model should have the following code. The Recipe class defines how single recipe should look like and you can say it is blueprint for creating recipe objects.
recipe.model.ts
export class Recipe {
    public name : string;
    public description : string;
    public imagePath : string;

    constructor(name : string, desc : string, imagePath : string){
        this.name = name;
        this.description = desc;
        this.imagePath = imagePath;
    }
}
That’s it. You had learnt about Angular 9 img src binding in ngFor loop. Hope it helped 🙂
Also See:
- Add a Responsive Bootstrap Navigation Bar in Angular 9
- Set default value in the dropdown list in Angular 9
- Dynamic and conditional CSS classes with ngClass : Angular
- Best way to delete components in Angular 9 with CLI ?
- HTML Property Binding in Angular : Data Binding
- This version of CLI is only compatible with Angular versions
- Global Angular CLI version is greater than your local version
- Create custom events and fire in Angular 9 with EventEmitter – Example
- ERROR in multi /bootstrap.min.css ./src/styles.css in Angular 9
- Bind selected element from drop down to an object in Angular 9
- Angular 9 Error : ‘app-header’ is not a known element
- Create common app-header component in Angular 9
- How to stop generation of .spec.ts test files using Angular CLI ?
- Emmet in Visual Studio Code not working ?
- Angular: Quickly create div classes in Visual Studio Code editor


what path should these files be saved in?